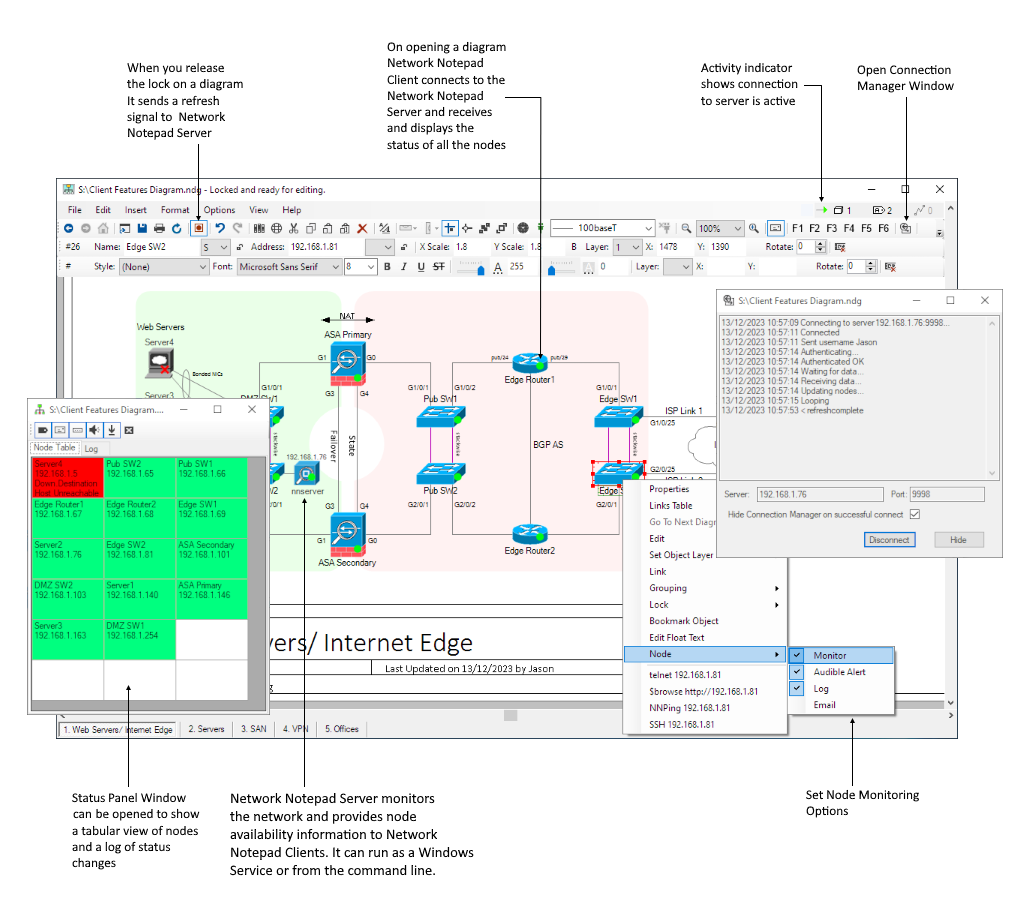
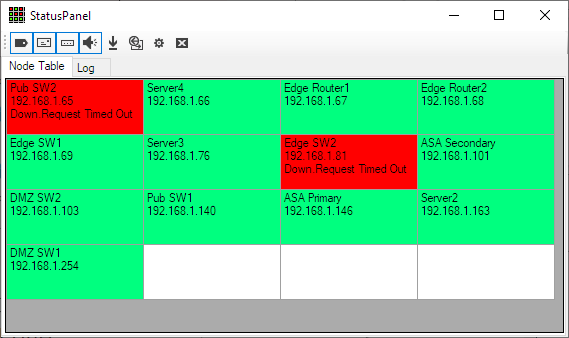
Network Notepad Client/Server EditionNetwork Notepad Server monitors the network and provides status updates to Network Notepad Clients.
Network Notepad Standalone Status Panel App
| ||||||||||||||||||||||||||||||||||||||||||||||||||||||||||||||||||||||||||||||||||||||||||||||||||||||||||||||||||||||||||||||||||||||||||||||||||||||||||||||||||||||||||||||||||||||||||||||||||||||||||||||||||||||||||||||||||||||||||||||||||||||||||||||||||||||||||||||||||||||||||||||||||||||||||||||||||||||||||||||||||||||||||||||||||||||||||||||||||||||||||||||||||||||||||||||||||||||||||||||||||||||||||||||||||||||||||||||||||||||||
| File Type | |||||||
| .bmp | .ico | .jpg | .gif | .png | .wmf | .emf | |
| Transparent background colour | Yes | Yes | Yes | Yes | Yes | Yes | |
| Scales nicely/ vector format | Yes | Yes | |||||
| Compressed File/ compact file | Yes | Yes | Yes | Yes | Yes | ||
| Lossless | Yes | Yes | Yes | Yes | Yes | Yes | |
Alternative Sound Effects For NNping And NNMonitor
To replace the sounds played when a node changes state in NNPing or NNMonitor, replace the Up.wav and Down.wav files in each program's installation folder. For NNping that is usually the Network Notepad installation folder C:\Program Files (x86)\Network Notepad Professional or C:\Program Files (x86) \Network Notepad Enterprise. For NNMonitor it is usually C:\Program Files (x86)\NNMonitor.
Suggested alternative for Up.wav: https://www.mediacollege.com/downloads/sound-effects/star-trek/tos/tos-computer-03.wav
Suggested alternative for Down.wav: https://www.mediacollege.com/downloads/sound-effects/star-trek/tos/tos-computer-04.wav
(Right-click and choose Save link as.... and rename the files to Up.wav and Down.wav)
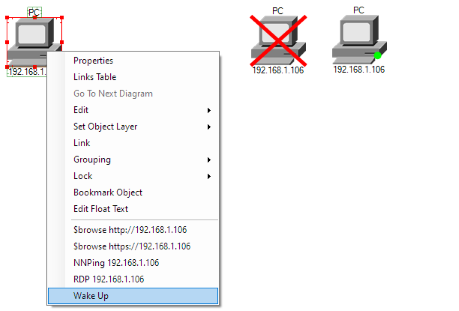
Wake-On-LAN Tool
|
The Wake-On-LAN tool is included with Network Notepad Professional and
Enterprise Editions. It is used to wake up sleeping
or suspended PCs and when combined with
NNPing provides
an audible and visual indication for when the PC becomes
available (for an RDP connection for example). |
 |
64-Bit Enterprise and Professional Editions
|
Script Objects Texturefill and Antialias Commands
|
|
texturefill ventarea ventscript9 |
texturefill path script
[x y] [xscale] [yscale] [angle] path - name of path to fill. script - name of script to use as a brush. x y - position of drawing. xscale yscale - optional scale transform. angle - optional rotation transform. |
|
|
antialias off |
antialias off | on off - switch off antialiasing on - switch on antialiasing |
|
|
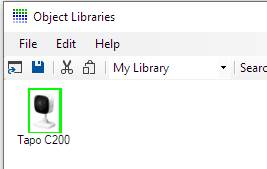
For an example of using these commands see the Wisenet XRN-1610SA NVR in the library |
||
Export to PDF
|
Export To Bitmap From Command Line
"c:\Program Files (x86)\Network Notepad Enterprise\NNEnterprise.exe" -export c:\tmp\outfile.png -page 2 c:\tmp\infile.ndg
Professional Edition Example
"c:\Program Files (x86)\Network Notepad Professional\dotnetpad.exe"
-export "c:\tmp\output file.gif" -page 1 "c:\tmp\input file.ndg" |
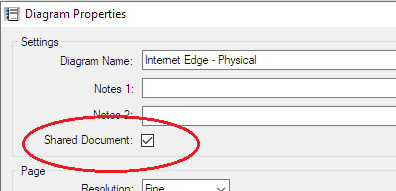
Network Notepad Enterprise Edition
| Network Notepad Enterprise Edition is aimed at users who need the option of collaborating on diagrams stored on a shared drive. It solves the problem where a document which is edited simultaneously by multiple users results in changes made by one user being overwritten by another user. | ||
| The default operation of Enterprise Edition is identical to the Professional Edition except when a document is marked as a shared document in the Diagram Properties Form. |
 |
|
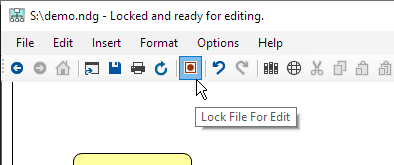
| A shared document is initially opened in read-only mode. All edit functions are disabled until the user clicks the Lock File Button. |
 |
|
| A "lock file" is created along side the document file. It stores the name of the user who has locked the file and the time and date the lock was created. |
 |
|
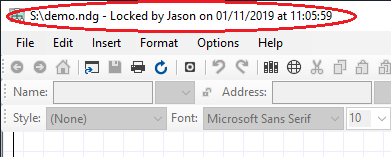
| Other users who have the document open will see the status displayed in the title bar. They are blocked from editing the document until the lock file is released. |
 |
|
| When the active user releases the lock by clicking the Lock File button again, the document is automatically saved. | ||
| The status is reflected in the title bar for other users and the refresh button changes colour to red to indicate an update is available. |
 |
|
| Clicking the refresh button reloads the document. Clicking the Lock button to make changes automatically reloads the document first if the diagram has been updated by another user. | ||
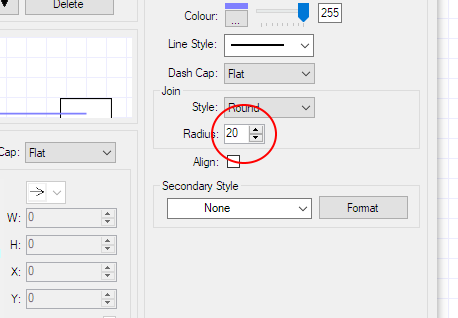
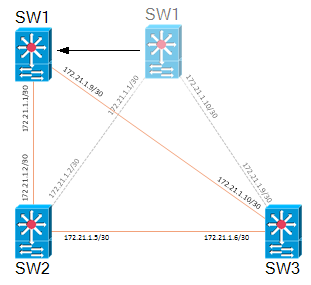
Radiused Link Joins
|
|
 |
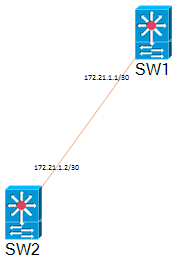
Attach Labels To Links
|
|
 |
|
|
How To Attach Labels To A Link |
 |
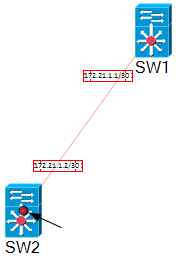 |
 |
 |
|
1. Place labels in approximate positions using the text tool. |
2. Select the link first (black/red circle indication at link termination point) then select each of the labels. |
3. Click Format and then Group. The labels are grouped with the link and are automatically rotated to follow the slope of the link segment. Selecting the link now also highlights the related labels. |
4. Finalise label positions using Drag and Drop or nudge. |
|
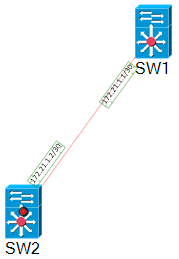
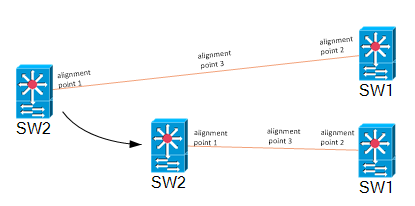
Alignment Points There are three alignment points on a
link segment, one at each end and one in the centre of the
link segment. The position of a label is relative to the
nearest alignment point when the label was first grouped
with the
link. Detatching A Label from A Link To detach a label from a link,
right-click the label and click Ungroup in the context menu. |
 |
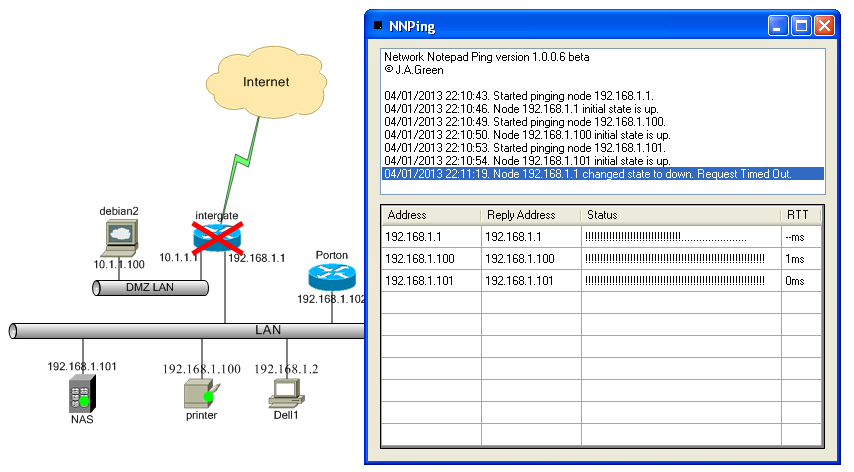
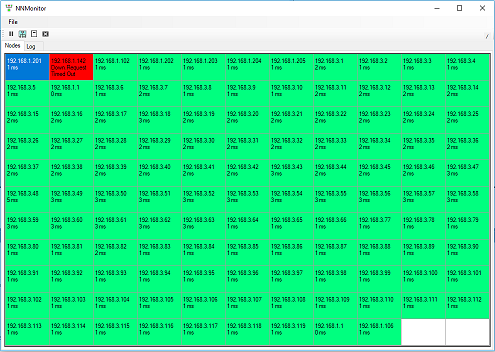
NNMonitor
NNMonitor is a ping monitoring program for use with Network Notepad Professional and Enterprise Editions. Open a Network Notepad .ndg file with NNMonitor and click the Run button to start pinging all of the nodes in the document. NNMonitor displays the status of each node and can send email alerts and play sound effects when nodes change state. It can also display the status of each node in Network Notepad and can be launched from as a tool in Network Notepad. More information here.
Script Objects "paint" command
The new "paint" command enables a Script Object to include other Script Objects in it's drawing. The command syntax is as follows:
| paint "RJ45 Socket" 50 20 | paint <script name> <X> <Y> [<optional X-scale> <optional Y-scale>] | |
| <script name> - The name of the script object to draw. It must be present in the current diagram's table of Script Objects. | ||
| <X> <Y> - The coordinates of the Script Object. | ||
| <X-scale> <Y-scale> - Optionally draw the Object Script using non-default scale values. |
The Format Script Object form has been updated to
make it easier to switch between Script Objects and use
the paint command.
The following example Script Object demonstrates
the paint command (copy and paste it to diagram to view):
Network Notepad Clipping v2.1
object 19
NM4-1G 0 0 ! ! ! ! ! 1 1 2 80 0 0 false 77 40 false 0 ! ! 77 40 0 0
0
script NM4-1G 77 40 .5
align + "3850 Network Module" 38 20
path name module
path addrectangle 0 0 77 40
path name vent
path addarc 0 0 6 6 90 180
path addarc 38 0 6 6 270 180
pen
black_pen1 &h000000& 255 0.1
pen dark_grey_pen1 &h606060& 255 0.5
pen silver_pen &hFFFFFF& 255 1
brush light_grey_brush2 &hc0c0c0&
255
brush dark_grey_brush &h606060& 255
brush black_brush
&h000000& 255
brush light_grey_brush3 &hD8D8D8& 255
fill
module light_grey_brush3 0 0
draw module black_pen1 0 0
fill
vent dark_grey_brush 16 2
fill vent dark_grey_brush 16 10
paint "RJ45 Socket tab up" 22 22.5 1 1
paint "RJ45 Socket tab up"
40 22.5 1 1
paint Screw 4 5 0.8 0.8
paint Screw 66 5 0.8 0.8
script "RJ45 Socket tab up" 15 13 .3
path name rj45down
path
addlines 2 7 2 9 3.5 9 3.5 10 9 10 9 9 10.5 9 10.5 7 12.5 7 12.5 0 0
0 0 7
path name single_port
path addrectangle 0 0 15 12
pen
blackpen1 &h000000& 255 1
brush black_brush &h000000& 255
brush silver_brush &hd0d8dc& 255
fill single_port silver_brush 0
0
fill rj45down black_brush 1 11 1 -1
script screw 8 8 .4
path name screw
path addarc 0 0 8 8 0 360
path name screwhead
path startfigure
path addlines 3 2 2 3 3 4 2 5 3 6 4 5 5 6 6 5 5
4 6 3 5 2 4 3
path closefigure
pen dark_grey_pen1 &h606060&
255 0.5
brush light_grey_brush2 &hc0c0c0& 255
brush
dark_grey_brush &h606060& 255
fill screw light_grey_brush2 0 0
draw screw dark_grey_pen1 0 0
fill screwhead dark_grey_brush 0 0
Merge Script Objects
Format > Merge Script Objects enables multiple
Script Objects to be merged in to a single Script Object. Text can
also be merged.
In the following example a simple hub is built up
from components in the online Script Objects Library and then merged:
1. Add the parent object which will act as a container for the
other components.
I have used Format Script Object to create a
simple box and given the script a new unique name (this is important).
|
|
script "Netgear FE104" 158 25 0.5 brush blue_brush &h8B4001& 255 path name Box path addrectangle 0 0 158 25 fill "Box" blue_brush |
2. Copy and paste script components from the
online library on to the parent object.
I have added four RJ45
sockets and then using the Text tool added a brand label.
![]()
3. Put the parent box and child components in to a
group.
Select the parent Box first followed by the 4 sockets and
the label, then select Format > Group on the ring menu.
The
objects are now loosely bound together.
![]()
4. Select the group by clicking the parent box
and then select Format > Merge Script Objects.
The parent box and
the 5 child objects are now merged into a single Script Object.
|
|
script "Netgear FE104 Hub" 158 25
0.6 brush blue_brush &h8B4001& 255 brush black_brush &h000000& 255 brush silver_brush &hd0d8dc& 255 brush brush1 &hFFFFFF& 255 path name Box path addrectangle 0 0 158 25 path name rj45down path addlines 2 7 2 9 3.5 9 3.5 10 9 10 9 9 10.5 9 10.5 7 12.5 7 12.5 0 0 0 0 7 path name single_port path addrectangle 0 0 15 12 path name path1 path addstring 0 0 NETGEAR arial 3 1 fill "Box" blue_brush fill single_port silver_brush 111.5 8 fill rj45down black_brush 112.5 19 1 -1 fill single_port silver_brush 66.5 8 fill rj45down black_brush 67.5 19 1 -1 fill single_port silver_brush 81.5 8 fill rj45down black_brush 82.5 19 1 -1 fill single_port silver_brush 96.5 8 fill rj45down black_brush 97.5 19 1 -1 fill path1 brush1 5.25 2.25 |
5. To save the new object to the current local library, right-click the object and select Format Script Object. Click the "Save to Library" checkbox and click OK.
Please email me a copy of your new scripts (or any new components) for inclusion in the online library!
There are a number of restrictions with the
Merge Script Objects feature:
-
The component objects must not be rotated.
-
The component objects must use their default x-scale and y-scale settings (That will be 1,2 or 4 depending on the Format > Resolution setting).
-
Name and Address labels are excluded from a merge.
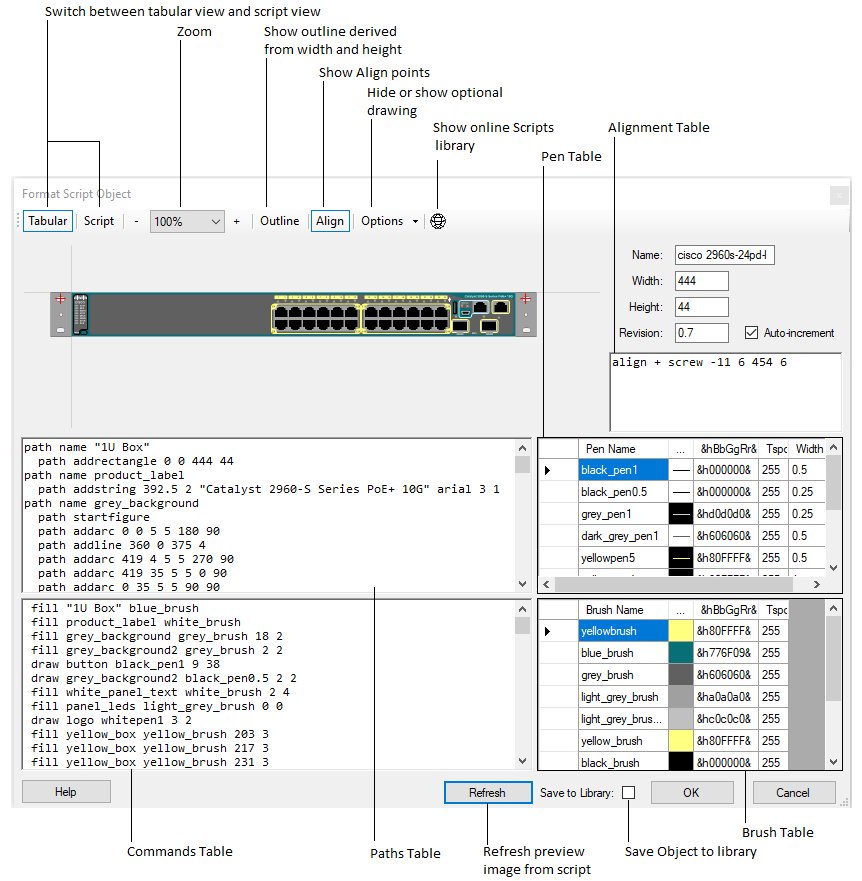
Format Script Object
Format Script Object provides an environment for creating and modifying Script Objects. Access it from the Format menu or right-click a Script Object in a diagram or the library window.
$ADDRLIST Variable
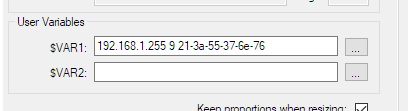
You can create a special object which is used to
start NNPing for multiple nodes at once.
Add an object and label
it "Ping all".
In the Address property for the object, list the
IP addresses of multiple nodes separated by ";" characters e.g.
192.168.1.1;192.168.1.2;192.168.1.3;192.168.1.4;192.168.1.5
Configure a function button like this:
Command:
NNPing $ADDRLIST 5000 3 up.wav 3
down.wav
Display:
NNPing List
Network Notepad Scripts
Network Notepad Script Objects are a way to construct vector-based
graphics
for use in Network Notepad.
Click
the Copy button next to the examples below and then paste in to Network Notepad.
Some browsers prompt you to allow access to the clipboard when
you click the Copy button.
More scripts are available in the
scripts library.
| Cisco Catalyst 2960S-24PD-L
Front View |
||
42U-Rack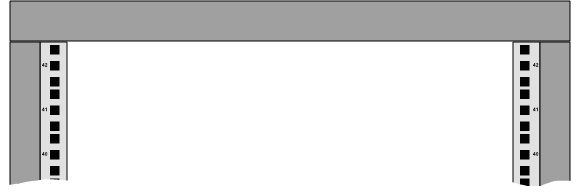 |
||
50cm Rule (Shown set to x2 scale)
 |
||
Network Notepad Scripts Help
A Script Object consists of the following statements:
1. The script statement sets the name, overall size of the object, and the revision number.
| script "Test object" 50 20 0.1 | script <name> <width> <height> <revision> | |
| <name> - name of the script object. If the name contains spaces then enclose it in "quotation marks". The name should be globally unique. | ||
| <width> - width of the object. | ||
| <height> - height of object.The width and height set the size of the outline box
displayed when pasting the object. In the examples I am using a default scale of 1pixel per mm. |
||
| <revision> - Revision number of
the script. When pasting scripts which already exist in the
diagram, the script will only be replaced if the new
script is a higher revision. |
2. Align statements optionally enable objects to be automatically aligned when one object is pasted or dragged and dropped on to another object.
| align + screw -11 6 454 6 -11 50.5 | align <+ or -> <type> <points> | |
| <+ or ->. A "+" script can only align with a "-" script. | ||
| <type> For scripts to align the type must match between the two scripts. | ||
| <points> A list of X Y alignment points. |
3. Path statements define the shapes, lines and text in the object.
| path name test | path name <name> <name> - name of graphics path. |
|
| path startfigure | Starts a new path
rather than drawing a line from the last position to the
next position. |
|
| path addline 10 10 10 20 | path addline
from <x1>
<y1> to <x2> <y2> Adds a line to the current path. |
|
| path addlines 10 10 10 20 30 15 | path addlines <x1>
<y1> <x2> <y2>... <xn> <yn> Adds a series of lines to the current path. |
|
| path addrectangle 10 20 30 40 | path addrectangle <x1>
<y1> <width> <height> Adds a rectangle at the position specified with the width and height specified. |
|
| path addarc 41 4 5 5 270 90 | path addarc <x> <y>
<width> <height> <start angle> <sweep angle> Adds an arc to the current path <x> <y> <width> <height> defines a rectangle which forms the bounds of the arc. <start angle> measured in degrees clockwise from the x-axis. <sweep angle> angle swept from start angle. |
|
| path addstring 39
2 "McGoozon" arial 3 1 |
path addstring <x>
<y> <"text"> <font name> <font size> <font style> <x> <y> specify the top left corner position of the text. <"text"> text string to draw. <font name> Name of font. Enclose in quotation marks if the font name contains spaces. <font size> <font style> Numeric value, Regular=0, Bold=1, Italic=2, Bold Italic=3, Underline=4, Strikeout=8 Use a fill command to draw text. If you use a draw command the outline of the text is drawn. |
|
| path closefigure | Draws a line from the
current position to the start point in the current path. |
4. Pen and Brush statements define the pens and brushes used in the commands section below.
| pen black_pen0.5 &h000000& 255 0.5 | pen <name> <colour> <transparency>
<width> Pens are used with draw commands to draw the outline of a a path. <name> named of the pen. <colour> Blue green and Red values in Hex. <transparency> 0-255 where 255 is solid colour. <width> width of line drawn with the pen. |
|
| brush grey_brush &ha0a0a0& 255 | brush <name> <colour>
<transparency> Brushes are used with fill commands to fill an area enclosed by a path. <name> named of the brush. <colour> Blue green and Red values in Hex. <transparency> 0-255 where 255 is solid colour. |
5. Commands are used to draw paths using pens and fill paths using brushes. The options command enables optional drawing commands to be executed at runtime by right clicking an object and selecting "Options".
| fill "test" grey_brush 20 10 | fill <path> <brush> <x>
<y> [<xscale> <yscale>] [angle] Fill an area enclosed by a path using the specified brush. Draw at position <x> <y> and apply an optional local scale transform. <path> name of path to fill. <brush> name of brush to use. <x> <y> position of drawing. <xscale> <yscale> scale transform. Negative values are used to flip the drawing about the x or y-axis. For an example of this see the left and right brackets in the 2960 switch which use the same path but flipped about the y-axis. <angle> optional rotation in degrees. |
|
| draw "top box" black_pen0.5 20 10 | draw <path> <pen> <x>
<y> [<xscale> <yscale>] [angle] Draw the outline of a path using the specified pen. Draw at position <x> <y> and apply an optional local scale transform. <path> name of path to draw. <pen> name of pen to use. <x> <y> position of drawing. <xscale> <yscale> scale transform. Negative values are used to flip the drawing about the x or y-axis. <angle> optional rotation in degrees. |
|
| option "brackets" | option <name> The option command is followed by optional fill and draw statements which can be enabled or disabled at run-time by right-clicking the object and choosing "Options". E.g. See the brackets and screws options in the 2960 switch example. <name> is the name of the option which will be displayed in the options menu. |
|
Grouping and Locking
Group objects by first selecting the parent object followed by any child objects, then select Format > Group.
Selecting the parent object now also selects all child objects when copying, nudging, dragging and dropping, etc.To Lock a group, right click the parent object and choose Lock > Group Lock.
Now when you resize the parent object, all child objects are proportionally resized as well.
Open Multiple Documents SimultaneouslyYou can now open more than one document at once. Each open document presents its own tab bar at the bottom of the window, where you can select pages from any open document instantly. You can also drag and drop or copy and paste pages between documents using the page tabs. These features are mainly useful if you work with many multi-page documents so it is disabled by default. To enable it, set the "Maximum Open Documents" setting in the Setup Form to a sensible figure such as 6.
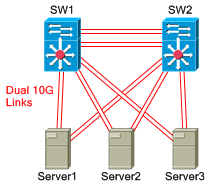
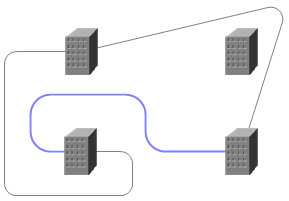
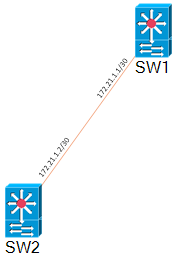
Nested Link Styles
E.g. in the following drawing the Dual 10G links consist of a red link 5 pixels wide with a secondary white link which is 3 pixels wide. See the Format Link Styles menu option for more information.
Copy and paste this section in to Network Notepad Professional Edition to reproduce this diagram:
Network Notepad Clipping v2.1
label 1 -64.75 3.25 "Dual 10G<<crlf>>Links" "microsoft sans serif" 8 true false false false &hFF& ! object &hFFFFFF& ! 0 255 0 ! 51.5 51.5 25.5 -64.75 3.25 0 0 0 ! 0 0
object 4 "data centre switch" -32.5 -52 2 ! ! ! 3 .5 .5 1 0 0 0 false 37.5 54.5 false 0 ! ! 37.5 54.5 -32.5 -52 0
object 5 "data centre switch" 85.5 -52 4 ! ! ! 5 .5 .5 1 0 0 0 false 37.5 54.5 false 0 ! ! 37.5 54.5 85.5 -52 0
object 6 fileserver -37 52 6 ! ! ! 7 .5 .5 1 0 0 0 false 28 43.5 false 0 ! ! 28 43.5 -37 52 0
object 7 fileserver 26.5 52 8 ! ! ! 9 .5 .5 1 0 0 0 false 28 43.5 false 0 ! ! 28 43.5 26.5 52 0
object 8 fileserver 90.5 52 10 ! ! ! 11 .5 .5 1 0 0 0 false 28 43.5 false 0 ! ! 28 43.5 90.5 52 0
label 2 n -35.75 SW1 ! ! ! ! false ! &h0& 4 object ! ! 0 255 0 ! 28 34 17 -32.5 -87.75 0 -1130.5 -310 ! -1130.5 -310
label 3 n -27.25 ! ! ! ! ! false ! &h0& 4 ip ! ! 0 255 0 ! 0 0 0 -32.5 -79.25 0 -1130.5 -310 ! -1130.5 -310
label 4 n -35.75 SW2 ! ! ! ! false ! &h0& 5 object ! ! 0 255 0 ! 28 34 17 85.5 -87.75 0 -1130.5 -310 ! -1130.5 -310
label 5 n -27.25 ! ! ! ! ! false ! &h0& 5 ip ! ! 0 255 0 ! 0 0 0 85.5 -79.25 0 -1130.5 -310 ! -1130.5 -310
label 6 s 30.25 Server1 ! ! ! ! false ! &h0& 6 object ! ! 0 255 0 ! 43.5 52.5 17 -37 82.25 0 -1130.5 -310 ! -1130.5 -310
label 7 n -21.75 ! ! ! ! ! false ! &h0& 6 ip ! ! 0 255 0 ! 0 0 0 -37 30.25 0 -1130.5 -310 ! -1130.5 -310
label 8 s 30.25 Server2 ! ! ! ! false ! &h0& 7 object ! ! 0 255 0 ! 43.5 52.5 17 26.5 82.25 0 -1130.5 -310 ! -1130.5 -310
label 9 n -21.75 ! ! ! ! ! false ! &h0& 7 ip ! ! 0 255 0 ! 0 0 0 26.5 30.25 0 -1130.5 -310 ! -1130.5 -310
label 10 s 30.25 Server3 ! ! ! ! false ! &h0& 8 object ! ! 0 255 0 ! 43.5 52.5 17 90.5 82.25 0 -1130.5 -310 ! -1130.5 -310
label 11 n -21.75 ! ! ! ! ! false ! &h0& 8 ip ! ! 0 255 0 ! 0 0 0 90.5 30.25 0 -1130.5 -310 ! -1130.5 -310
link_object 1 4 6 red5 ! ! ! ! ! ! 0 0 0 0 ! False 3
link_object 2 6 5 red5 ! ! ! ! ! ! 0 0 0 0 ! False 3
link_object 3 4 7 red5 ! ! ! ! ! ! 0 0 0 0 ! False 3
link_object 4 4 8 red5 ! ! ! ! ! ! 0 0 0 0 ! False 3
link_object 5 8 5 red5 ! ! ! ! ! ! 0 0 0 0 ! False 3
link_object 6 5 7 red5 ! ! ! ! ! ! 0 0 0 0 ! False 3
link_object 7 4 5 red5 ! ! ! ! ! ! 0 0 0 0 ! False 3
link_object 8 4 5 red5 ! ! ! ! ! ! 9.5 -13 -10.5 -13 ! False 3
define_link red5 0 &hFF& 1 5 9 0 0 0 0 0 0 0 255 False white3 0 0 0 0 0 0 0 0 0 0 0 0
define_link white3 0 &hFFFFFF& 1 3 9 0 0 0 0 0 0 0 255 False None 0 0 0 0 0 0 0 0 0 0 0 0NNPing Tool for Network Notepad Professional, Enterprise and Client
The NNPing tool provides a real time visual and audio indication of the state of objects in your diagram.
NNPing is installed and configured automatically in recent installations. For earlier installations, upgrade to the latest version and then define a function button like this:Command(0,11)=nnping $ipaddress 1000 3 up.wav 3 down.wav
Display(0,11)=NNPing $IPADDRESS
AutoMin(0,11)=FalseThe NNPing arguments shown above are as follows:
nnping <ipaddress> <timeout> <up retries> <up sound> <down retries> <down sound>
Rotate and Resize Using The Mouse
Network Notepad Professional Edition
- Compatibility - It's a major rewrite using Microsoft .NET, so it offers better compatibility and stability with the latest Windows operating systems compared to the freeware edition.
- Zoom - Work with and edit diagrams at any zoom level.
- Resolution - Draft, Fine and Superfine modes for improved graphics and printing.
- Rotate - Rotate text and rotate objects to any angle. Drag-and-Rotate.
- Workspace - Supports larger workspace bitmap / larger diagrams.
- Multi-page diagrams - Add as many pages to a diagram/ document as you wish and access the pages instantly using the onscreen page tabs.
- Custom shapes - Create your own customizable shapes inside of Network Notepad Professional Edition.
- Grouping and Locking - Combine two or more objects to make composite objects.
- Auto-align links - Can be enabled for a link style or for an individual link so that connection alignment is maintained horizontally and vertically.
- Library Search - Find objects in all of your libraries using keywords. Save the result as a new library.
- Enhanced Link Styles - New lightning and curve link styles.
- Template Diagrams - When you start a new diagram, select from the list of templates to set the page size, orientation, link styles, and any default drawing such as a title block and border.
- Print Preview.
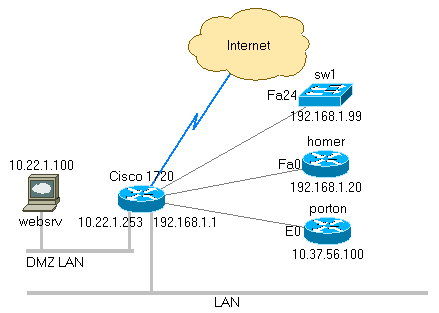
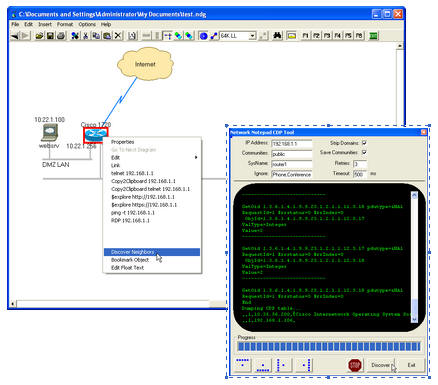
Network Notepad CDP Neighbor Tool
Network Notepad CDP Neighbor Tool adds auto-discovery features to Network Notepad if you have a network with Cisco products and other products which support Cisco Discovery Protocol.
- Right click an object and select "Discover Neighbors".
- Click the paste button in Network Notepad to draw the discovered devices, along with links, interface descriptions and float text showing the model types.
- Automatically shows the relevant icon for switches, routers, access points etc.