| |
1. The Script
Statement
|
| |
|
|
| |
script |
The script statement sets the name, the
overall size of the object, and the revision number. |
| |
|
|
| |
|
script
name width height revision |
| |
|
|
| |
|
name - name of the script
object. If the name contains spaces then enclose it in
"quotation marks". The name should be globally unique. |
| |
|
width - width of the object. |
| |
|
height - height of object.The
width and height set the size of the outline box
displayed when pasting the object.
In the examples I am using a default scale of 1pixel per
mm. |
| |
|
revision - Revision number of
the script. When pasting scripts which already exist in
the diagram, the script will only be replaced if the new
script is a higher revision. |
| |
|
script "Test
object" 50 20 0.1 |
| |
|
|
| |
2. Path statements
|
| |
|
|
| |
path |
Path statements
define the shapes, lines and text in the object. |
| |
|
|
| |
|
path name
name
name - name of graphics
path.
|
| |
|
|
| |
|
path startfigure
Starts a new path rather than continuing the current
path.
|
| |
|
|
| |
|
path addline
x1 y1 x2 y2
Adds a line to the current
path.
|
| |
|
|
| |
|
path addlines
x1 y1 x2 y2... xn yn
Adds a series of
lines to the current path.
|
| |
|
|
| |
|
path addrectangle
x1 y1 width height
Adds a rectangle at
the position specified with the width and height
specified.
|
| |
|
|
| |
|
path addarc
x y width height start-angle sweep-angle
Adds an arc to the current path.
x y width
height - define a rectangle which forms the bounds
of the arc.
start-angle - measured in
degrees clockwise from the x-axis.
sweep-angle
- angle swept from start angle.
|
| |
|
|
| |
|
path addstring
x y "text" font-name font-size font-style
Adds a text string to the current path.
x y - specify the top left corner position of
the text.
"text" - text string to draw.
font-name
- Name of font. Enclose in quotation marks if the font
name contains spaces.
font size - Font size.
font style -
Numeric value, Regular=0, Bold=1, Italic=2, Underline=4,
Strikeout=8
Add font style values to combine them
e.g. Bold+Italic+Underline =7
Use a fill command rather than a draw command to render
text. If you use a draw command the outline of the text
is drawn.
|
| |
|
|
| |
|
path closefigure
Closes a path by extending it to the start point in
the path.
Example path statements:
path name module
path addrectangle 0 0 77 40
path name vent
path
addarc 0 0 6 6 90 180
path addarc 38 0 6 6 270 180
path name "SFP Slot"
path addrectangle 0 0 14 9
path name label
path addstring 0 0 "SFP" arial 2.25 1
path name screw
path addarc 0 0 8 8 0 360
path name screwhead
path
startfigure
path addlines 3 2 2 3 3 4 2 5 3 6 4 5 5 6
6 5 5 4 6 3 5 2 4 3
path closefigure |
| |
|
|
| |
3. Pens and Brushes
|
| |
|
|
| |
pen |
Pen statements set the colour and
thickness of a line when used with the draw command
below. |
| |
|
|
| |
|
pen name colour
transparency width
name - name of
the pen.
colour - Blue green and Red values in Hex.
transparency - Number from 0-255 where 255 is
solid colour.
width - width of line drawn
with the pen.
pen black_pen0.5 &h000000& 255 0.5
draw outline black_pen0.5 |
| |
|
|
| |
brush |
Brush statements set the colour used
with the fill command below. |
| |
|
|
| |
|
brush name colour
transparency
Brushes are used with fill commands to fill an area
enclosed by a path.
name - name of the
brush.
colour
- Blue Green and Red values in Hex.
transparency
- Number from 0-255 where 255 is solid colour.
brush grey_brush &ha0a0a0& 255
fill body grey_brush |
| |
|
|
| |
gradientbrush |
A gradientbrush is used to fill an area
enclosed by a path using a brush which transitions from
one colour to another. |
| |
|
|
| |
|
gradientbrush name
colour1 transparency1 colour2 transparency2 width height
angle
name - name of the gradientbrush.
colour1
- starting colour in hex.
transparency1 -
Number from 0-255 where 255 is solid colour.
colour2 - Ending colour in hex.
transparency2 - Number from 0-255 where 255 is
solid colour.
width, height - define the
size of the brush.
angle - direction of
gradient.
gradientbrush cloudbrush &hE4E4E4& 255
&h646464& 255 1 62 90
fill cloudpath cloudbrush |
| |
|
|
| |
4. Commands
|
| |
|
|
| |
draw |
Draw the outline of a path using the
specified pen. Draw at position x y and apply an
optional local scale transform and/or rotate transform. |
| |
|
|
| |
|
draw path pen x y
[xscale yscale] [angle]
path - name
of path to draw.
pen - name of pen to use.
x y -
position of drawing.
xscale yscale - scale transform. Negative
values are used to flip the drawing about the x or
y-axis.
angle
- optional rotation angle in degrees (introduced in
version 1.3.11).
draw "top box" black_pen0.5 20
10 |
| |
|
|
| |
fill |
Fill an area enclosed by a path using
the specified brush. Draw at position x y and apply an
optional local scale transform and/or rotate transform. |
| |
|
|
| |
|
fill path brush x
y [xscale yscale] [angle]
path -
name of path to fill.
brush - name of brush
to use.
x y
- position of drawing.
xscale yscale - scale
transform. Negative values are used to flip the drawing
about the x or y-axis. For an example of this see the
left and right brackets in the 2960 switch which use the
same path but flipped about the y-axis.
angle
- optional rotation angle in degrees (introduced in
version 1.3.11).
fill test "grey brush" 20 10 |
| |
|
|
| |
paint |
Enables a Script Object to include
other Script Objects in it's drawing. |
| |
|
|
| |
|
paint script x y
[xscale yscale]
script - The name
of the script object to draw. It must be present in the
current diagram's table of Script Objects.
x y
- The coordinates of the Script Object.
xscale
yscale - Optionally draw the Object Script using
non-default scale values.
(The paint command was
introduced in version 1.3.36)
paint "RJ45 Socket"
50 20
|
| |
|
|
| |
texturefill |
Fills a path using another script as
the brush.
|
| |
|
|
| |
|
texturefill path
script [x y] [xscale] [yscale] [angle]
path - name of path to fill.
script - name of
script to use as a brush.
x y - position of
drawing.
xscale yscale - optional scale
transform.
angle - optional rotation
transform.
texturefill ventarea ventscript9 |
| |
|
|
| |
option |
The option command is followed by
optional fill, draw and paint statements which can be
enabled or disabled at run-time by right-clicking the
object and choosing "Options". E.g. See the brackets and
screws options in the 2960 switch example. |
| |
|
|
| |
|
option name
[optional mask]
name - provides the text
which will be displayed in the options menu.
mask
- This option controls how the entries in the options
menu work. Without a mask or with a mask value 0 you can
switch any option on or off. With a mask the options
covered by the mask are mutually exclusive. You can
select one option only from the masked options and at
least one of those masked options must be selected.
In the example below the first 3 options are grouped
using the mask value 7 and allow you to choose a
background colour. The next two options are grouped
using mask value 24 and allow you to choose a border
colour.
The mask values are derived from the order
the options are read in and assigned a bit value. The
first 3 options correspond to bits 0-2 which gives a
binary value 111 and mask value 7. Bits 3-4 give a
binary value 11000 and mask value 24.
The option end
statement enables drawing to continue after the options.
option end
"option end" is a special case. It is not
displayed in the options menu and merely permits normal
drawing to continue after options.
script "cloud7
with options" 100 70 1.6
pen red_pen &h0000ff& 255 1
pen blue_pen &hff0000& 255 1
brush grey_brush
&hD4D4D4& 255
brush red_brush &h9595FF& 255
brush yellow_brush
&h16E3E9& 255
brush black_brush &h000000& 255
path
name cloud
path addarc 0 22 40 40 278 -188
path
addarc 60 22 40 40 90 -160
path addarc 52 8 35 35 -10
-102
path addarc 23 1 40 40 330 -153
path name text
path addstring 27 32 "The Cloud" arial 7 1
option "background grey" 7
fill cloud grey_brush
option
"background red" 7
fill cloud red_brush
option "background yellow" 7
fill cloud yellow_brush
option "border red" 24
draw cloud red_pen
option "border blue" 24
draw cloud blue_pen
option
end
fill text black_brush |
| |
|
|
| |
antialias |
Switches antialiasing off or on. The
default setting is on. |
| |
|
|
| |
|
antialias off | on
off - switch off antialiasing.
on - switch on
antialiasing. |
| |
|
|
| |
5. Align Statements
|
| |
|
|
| |
align |
Align statements
optionally enable objects to be automatically aligned
when one object is pasted or dragged and dropped on to
another object. |
| |
|
|
| |
|
align +|- type
points
+|-. A "+" script can only align with a "-"
script.
type - For scripts to align the type
must match between the two scripts.
points -
A list of X Y alignment points.
align + screw -11 6 454 6 -11 50.5 |
Format Script Object provides an
environment for creating and modifying Script Objects. Access it
from the Format menu or right-click a Script Object in a diagram
or the library window.
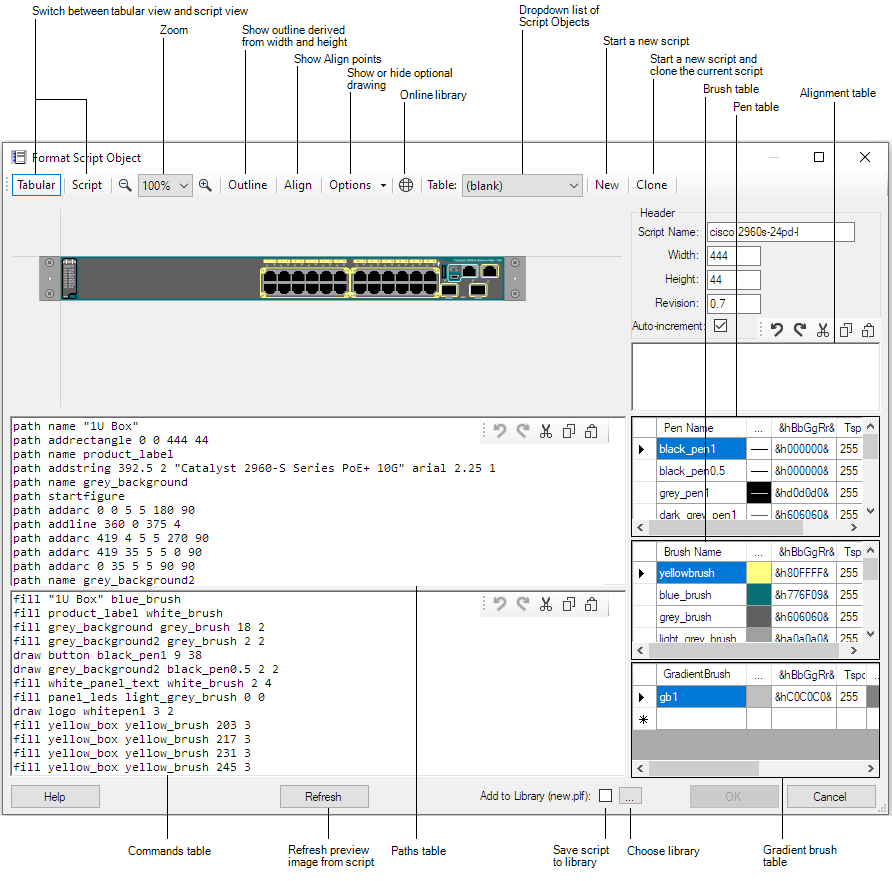
To paste a script in to the editor, switch to script view
(Script button) and paste in to the main panel.
Colour
Pickers for pens and brushes are available in the Tabular view
by clicking the elipsis column (...) in the respective tables.
&hBbGgRr& specifies the Blue, Green and Red components of the
colour in Hex.
Tspcy is the colour transparency value
from 0 to 255, where 255 is solid colour.
The form is resizable and the panels can also be resized by
dragging the horizontal and vertical bars which divide the
panels.
Click the Refresh button to apply changes made in the script
panels.
2. Copy and paste script components from
the online library on to the parent object.
I have added four
RJ45 sockets and then using the Text tool added a brand label.
3. Put the parent box and child
components in to a group.
Select the parent Box first
followed by the 4 sockets and the label, then select
Format > Group on the ring menu.
The objects are now
loosely bound together.
4. Select the group by clicking the
parent box and then select Format > Merge Script Objects.
The parent box and the 5 child objects are now merged into a
single Script Object.